Thursday 28 September 2017

머신 러닝 - 개념 정리

머신 러닝

"머신 러닝이란 데이터를 기반으로 하여 만들어진 학습모델로써, 성능 측정을 통해 의사 결정을 만들어 낸다" - Jason Brownlee

# 예전 보다 알고리즘이 많아지면서 더욱더 좋은 예측 값을 만들어 내면서 각광을 받기 시작함,  다만 실제적으로 적용할수 있는지를 확인 하는것이 중요하다.

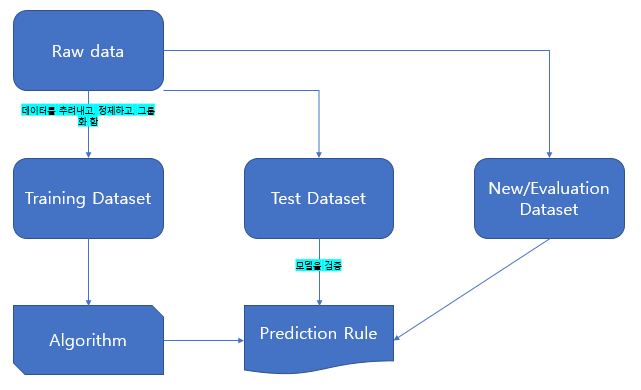
적절한 데이터를 수집하고 정제 하여 학습 algorithm 을 반복 처리 하는 과정을 통해 한 model을 생성하고 이를 기반으로 예측을 할수 있게 한다.

학습이란?
축적한 데이터로 실행 가능한 작업(Task)를 예측하는데 사용. 그럼 algorithm/model 인가?


  1. 단계 - 학습 단계 : 입력 값과 출력 값의 맵핑 (학습 단계)
  2. 단계 - 검증 및 데스트 : 학습 단계로 생성된 모델을 검토 하는 단계, 정밀도를 측정 함
  3. 단계 - 적용 단계 : 실제 데이터를 대상으로 분석 결과를 만들어낸다. UAT 라고 보면 된다.

Task (문제 / 해결해야 하는 목표)
성능을 측정하는게 중요하다, '성능'이란 문제가 해결될수 있다는 확신할수 있는 일종의 수준을 의미하고, 다른 데이터셋으로 과 알고리즘을 적용해서 만들어진 다양한 모델들은 비교하는것이 무의미하다 다만 그 결과값은 일정해야 한다.

Algorithm ( 알고리즘 )
Task 와 데이터를 이해하고 적절한 알고리즘을 사용하는것이 매우 중요하다 세상은 넓고 알고리즘은 넘쳐 난다.

Model 
정제화된 데이터와 알고리즘을 적용한 결과물 
  1. 논리적 모델
  2. 기하 모델
  3. 확률 모델
데이터의 비일관성
  • Under-fitting : 데이터가 학습에 불충분 하거나 모델링이 제대로 이루어 지지 않아서.
  • Over-fitting : 너무 많은 데이터로 인해서 발생한다. 적은 수의 데이터가 지속적으로 곡선에서 벗어 나면 그 성능은 저하된다. 학습이 아닌 기억을 하면 발생한다.
  • Data-instability : 사람에 의해 발생하는 오류를 바로 잡아야 한다.
  • Unpredictable data formats : 지원 하지 않는 데이터 포멧일수 있다.
# 데이터를 잘 잡으면 under/over fitting 잘 안나옴. 이상한 데이터는 사전에 잘 정리해주는것이 중요하다, 다만 Unpredictable data formats - 과거에 없었던 데이터가 들어오면 예측할수없는 데이터 (new trend 라고 봐야지 이상데이터와는 다르다)

학습 문제의 유형
  1. Classification : 데이터의 나누는 기법이다. - 옛날에나 쓰던거
  2. Clustering : 특정 목표가 없는 상태에서 수행되는 분류법 
  3. Forecasting/Prediction/Regression : 수식을 가장 많은 데이터를 기반으로 만들고, 이에 맞지 않는데 데이터를 제거 하는것을 Regression 이라고 한다. 
  4. Simulation : 보통 데이터를 받으면 어떠한 기법으로 분류 해야하는지도 모른다, 미리 한번 가정해서 돌려봐야 알수있는경우가 종종 있다.
  5. 최적화 : 가장 효과적인 방법, 불확실성에 대한 시뮬레이션을 수행하는 경우와는 달리, 최적화에서는 데이터에 대한 액세스뿐아니라, 어트리뷰트 간의 의존성과 관계에 대한 정도보 필요하다, 귀납법(임의 실험에서 얻은 결과를 다음번 시험에 활용), 반복적으로 개선시켜 나간다.
학습 관련 세부 분야

  1. Supervised learning : 입력값과 출력값을 이미 알고 있는것이 지도 학습의 핵심이다. 입력값과 출력값의 매핑 알고리즘으로 새로운 데이터에 대한 결과 값을 예상 할수있다.
  2. Unsupervised learning : 대상이 불명확한 상태를 갖고 시작하는 분류 작업에 해당, input 가 output 간의 맵핑 attribute 의 구조를 파악하는것, 사전에 결과 attribute 가 정의 되어 있지 않다는걸 알아야 한다.
  3. Semi-supervised learning : 인간의 학습방법과 유사하다,레이블 데이터(정제된)와 레이블이 없었던 데이터 모두를 사용한다, 여기서 레이블이 없는 데이터에 대한 가정을 잘 세우는것이 중요함.
    1. Reinforcement learning : 결과에 대한 보상을 최대화 하는데 초점을 두는 학습법.
  4. Deep learning : 머신 러닝 + AI, 인공 신경망 모델을 만드는데 사용됨, 레이블 데이터 비중이 매우 낮은 데이터 셋을 갖고 아고리즘을 돌린다.
    1. 합성곱 네트워크
    2. RBM(Restricted Bolzmann Machine)
    3. DBM(Deep Belief Networks)알고리즘
    4. 스택형 오토인코더 알고리즘 (Stacked Autoencoder)
성능 측정
  • Approximate - 가설에 대해 오류 데이터를 수용할수 있는 정도.
  • Probability - 가설이 얼마나 정확한지에 대한 확률 측정.
분석 결과가 적정한가?


TP - 올바르게 판단하다, 옳은것을
FP - 잘못 판단하다, 옳은것을 ( 오탐 )
FN - 잘못 판단하다, 틀리다고 ( 미탐 )
TN - 올바르게 판단하다, 틀리다고 

  1. Accuracy : (TP + TN) / (TP+TN+FN+TN)
  2. Recall : TP / (TP + FN)
  3. Precision : TP / (TP + FP)
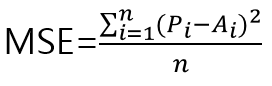
평균 제곱 오차 (MSE : Mean Squared Error)
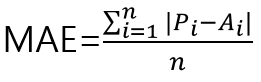
P_i = 예측 값
A_i = 실제 값

평균 절대 오차 (MAE : Mean Absolute Error)
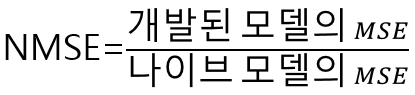
정규화 MSE와 MAE(NMSE와 NMAE)
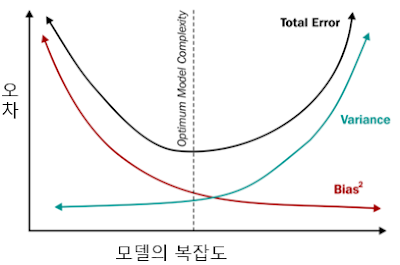
에러 처리 : 바이어스와 분산

학습 데이터를 이용해 모델을 만들고, 테스트 데이터로 그 오차를 줄인다. 모델이 학습데이터에 점점 비슷해지면 테스트 데이터에 대한 오차가 증가한다.

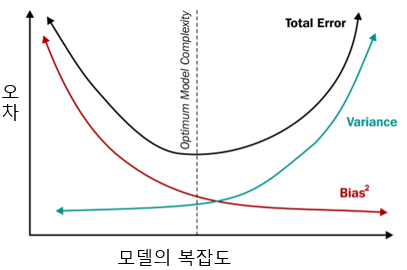
그래서 적절한 시점에서 수정 작업을 마쳐야 한다.

머신 러닝의 주요 분야
데이터 마이닝 - 대규모 데이터에 비즈니스 규칙을 적용, 가치 있는 정보를 생성하는작업
AI - 계획을 세우고, 일정을 수립/괸리할 수 있으며, 자동화 할수 있는 기술.
통계 학습 - 데이터 샘플을 이용해 예측, 함수를 만들어낸다.
데이터 과학 - 데이터를 상품에 맞추는 작업.

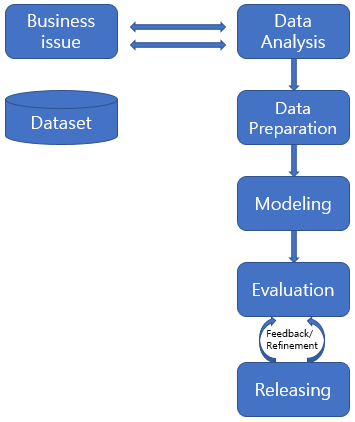
머신 러닝 프로세스 라이프 사이클과 솔루션 아키텍처
  1. 문제의 정의, 목표, 해결 과정
  2. 어떤 형태의 문제인지 파악
  3. 모델의 정확도를 측정할수 있게 적절한 측정 기준
  4. 모델이 새 데이터에도 잘 돌아가는지 확인


머신러닝 알고리즘

의사 결정 트리 기반 알고리즘
  • Random Forest
  • CART(Classification And Regression Tree)
  • C4.5 alc C5
  • Chi-square
  • GBM(Gradient Boosting maschine
  • CHAID(Chi-squared Automatic Interaction Detection)
  • Decision Stump
  • MARS(Multivariate Adaptive Regression Splines
베이지언 기법 기반 알고리즘
  • Naive Bayes
  • Averaged One-Dependece Estimators
  • Bayesian Belief Network
커널 기법 기반 알고리즘
  • SVM(support vector machine)
  • LDA(Linear Discriminant Analysis
클러스터링 기법
K-평균
EM(Expectation Maximination)
GMM(Gaussian Mixture Models)

인공 신경망(ANN)기법
LVQ(Learning Vector Quantization
SOM(Self-Organizing Maps
Hopfield network
Perceptron
Backpropagation

차원 축소화(dimensionality reduction)
MDS(Multidimensional Scaling)
PCA(Principal Component Analysis)
Projection Pursuit
Partial Least Squares
Sammon Mapping

앙상블 기법(Ensemble methods)
Random Forest
Bagging
AdaBoost
Bootstrapped Aggregation
Stacked Generalization
GBM(Gradient Boosting Machines)

인서턴스 기반 학습 알고리즘
KNN(K-Nearest Neighbour, K-최근접 이웃)
Self-Organizing
LVQ(Learning Vector Quantization)
SOM(Self-Organizing Maps)

회귀 분석 기반 알고리즘
Ordinary Least Squares
Logistic regression
MARS(Multivariate Adaptive Regression Splines)
Step-wise Regression

연관 규칙 기반 학습 알고리즘
Apriori Algorithm
ECLAT Algorithm

머신 러닝 툴과 프레임워크
1st - SAS,SPSS,Weka, R
2st - Hadoop, MapReduce, Apache Mahout,RapidMinder, Pentaho, Madlib
3st - Batch, Real-time analytics, deep analytics, Apache Spark, Haloop, Regel
4st - R, Julia, Python, Mahout, Spark

# 회계 분석 은 왜 그런지 알수있음, 그러나 신경망은 performance 는 비슷하게 나오지만 blackbox 라 왜 그런지는 모름.

성능 높이는 방식 - 데이터 size 조정보단 , 변수 개수 조정, 변수값 만들어 내는 방법역시 고민을 해야한다.


Thursday 23 April 2015

Android Simple Share Button -5/간단한 쉐어 버튼 만들기...

Introduce how to add share button in your application.

Now I would like to use previous app which I post below.
Use Save button add additional share button under current alert dialog.


1.WebviewActivity.java


...
public void onClick(View v) {
...

...
builder.setItems(new CharSequence[] { "URL Save", "Screenshot",

"Screenshot + Share", "URL Share", "exit" },
...
...
case 2:
// save screenshot
View vi = webview.getRootView();
vi.setDrawingCacheEnabled(true);
Bitmap bitmap = Bitmap.createBitmap(vi
.getDrawingCache());
vi.setDrawingCacheEnabled(true);
String savename = "KarlScreenShot"
+ System.currentTimeMillis() + ".png";
try {
FileOutputStream fos = new FileOutputStream(
new File(
Environment
.getExternalStoragePublicDirectory(
Environment.DIRECTORY_PICTURES)
.toString(), savename));
bitmap.compress(CompressFormat.PNG, 100, fos);
fos.flush();
fos.close();
} catch (FileNotFoundException e) {
e.printStackTrace();
} catch (IOException e) {
e.printStackTrace();
}
String imagePath = Environment
.getExternalStoragePublicDirectory(Environment.DIRECTORY_PICTURES)
+ "/" + savename;
Log.d("check imagePath", imagePath);
File imageFileToShare = new File(imagePath);

MediaScannerConnection.scanFile(ctx,
new String[] { imageFileToShare
.getAbsolutePath() }, null,
new OnScanCompletedListener() {
public void onScanCompleted(String path,
Uri uri) {
Log.v("grokkingandroid", "file " + path
+ " was scanned seccessfully: "
+ uri);
}
});
Intent share = new Intent(Intent.ACTION_SEND);
share.setType("image/*");
Uri uri = Uri.fromFile(imageFileToShare);
share.putExtra(Intent.EXTRA_STREAM, uri);
startActivity(Intent.createChooser(share,
"Share Image!"));
break;
case 3:
Intent textshare = new Intent(
android.content.Intent.ACTION_SEND);
textshare.setType("text/plain");
textshare
.addFlags(Intent.FLAG_ACTIVITY_CLEAR_WHEN_TASK_RESET);
textshare.putExtra(Intent.EXTRA_SUBJECT,
currentUrlTitle);
textshare.putExtra(Intent.EXTRA_TEXT, currentUrl);
Log.d("What do you Think", currentUrlTitle + currentUrl);
startActivity(Intent.createChooser(textshare,
"Share link!"));

break;
...

Wednesday 22 April 2015

Android Simple Alert Screenshot Button -4/간단한 스샷 버튼 만들기...

Introduce how to add screenshot button in your application.

Now I would like to use previous app which I post below.
Use Save button add alert with screenshot button.


1.WebviewActivity.java


...
public void onClick(View v) {

...

case R.id.bScript:
AlertDialog.Builder builder = new AlertDialog.Builder(ctx);
builder.setTitle("How do you like to save this page?");
builder.setItems(new CharSequence[] { "URL Save", "Screenshot", "exit" },
new DialogInterface.OnClickListener() {
public void onClick(DialogInterface dialog,
int which) {
switch (which) {
case 0:
// save url in sqlite
DatabaseOperations dop = new DatabaseOperations(
ctx);
dop.addUrl(dop, currentUrl, currentUrlTitle);
Toast.makeText(ctx,
"URL is successfully saved", 0)
.show();
break;
case 1:
// save screenshot
View v = webview.getRootView();
v.setDrawingCacheEnabled(true);
Bitmap bmp = Bitmap.createBitmap(v
.getDrawingCache());
v.setDrawingCacheEnabled(true);
String filename = "KarlScreenShot"
+ System.currentTimeMillis()
+ ".png";
try {
FileOutputStream fos = new FileOutputStream(
new File(
Environment
.getExternalStoragePublicDirectory(
Environment.DIRECTORY_PICTURES)
.toString(),
filename));
bmp.compress(CompressFormat.PNG, 100,
fos);
fos.flush();
fos.close();
} catch (FileNotFoundException e) {
e.printStackTrace();
} catch (IOException e) {
e.printStackTrace();
}
Toast.makeText(ctx,
"Screenshot is successfully saved",
0).show();
break;
case 2:
break;
}
}
});
builder.create().show();

break;
...

2. AndroidManifest.xml

...
<uses-permission android:name="android.permission.WRITE_EXTERNAL_STORAGE" />
...

please do not forget to add this permission.


Simple usage of sqlite with android.//sqlite 간단한 사용법 -3 delete sqlite

Introduce how to use sqlite with Android - Delete saved URL.


1. popup_list.xml


...
<Button
        android:id="@+id/bDelete"
        android:layout_width="24dp"
        android:layout_height="24dp"
        android:layout_gravity="center"
        android:layout_toRightOf="@+id/col2tv"
        android:focusable="false"
        android:focusableInTouchMode="false"
        android:background="@drawable/delete" />
...

2. WebviewActivity.java


...
private void initiatePopupWindow() {
...
Button b = (Button) v.findViewById(R.id.bDelete);
b.setOnClickListener(new OnClickListener() {

@Override
public void onClick(View arg0) {
new AlertDialog.Builder(ctx)
.setTitle("Script entry")
.setMessage(
"Are you sure you want to delete this script?")
.setPositiveButton(
android.R.string.yes,
new DialogInterface.OnClickListener() {
public void onClick(
DialogInterface dialog,
int which) {
// continue with delete
// no idea how to get this
// id.
String currentid = ((TextView) v
.findViewById(R.id.coltv))
.getText()
.toString();
Log.d("clickedid",
currentid);
DatabaseOperations dop = new DatabaseOperations(
ctx);
dop.deleteScript(dop,
currentid);
pwindo.dismiss();
Toast.makeText(
ctx,
"selected script was successfully deleted",
Toast.LENGTH_LONG)
.show();
}
})
.setNegativeButton(
android.R.string.no,
new DialogInterface.OnClickListener() {
public void onClick(
DialogInterface dialog,
int which) {
// do nothing
}
})
.setIcon(android.R.drawable.ic_dialog_alert)
.show();
// TODO Auto-generated method stub
}
});
...

3. DatabaseOperations.java


...
public void deleteScript(DatabaseOperations dop, String rowId) {
Log.d("db selected id?", rowId);
sql = dop.getWritableDatabase();
sql.execSQL("DELETE FROM  urlhistory where id='"+ rowId +"'");
}
...

Simple usage of sqlite with android.//sqlite 간단한 사용법 -2 읽어오기

Introduce how to use sqlite with Android - read data from sqlite.


1. screen_popup.xml


<LinearLayout xmlns:android="http://schemas.android.com/apk/res/android"
    android:id="@+id/popup_element"
    android:layout_width="fill_parent"
    android:layout_height="fill_parent"
    android:background="#444444"
    android:orientation="vertical"
    android:padding="10sp" >

    <ListView
        android:id="@+id/lvScriptHistory"
        android:layout_width="wrap_content"
        android:layout_height="260dp" >
    </ListView>

    <Button
        android:id="@+id/btn_close_popup"
        android:layout_width="wrap_content"
        android:layout_height="wrap_content"
        android:layout_gravity="center"
        android:text="Close" />

</LinearLayout>

2. popup_list.xml


<?xml version="1.0" encoding="utf-8"?>
<RelativeLayout xmlns:android="http://schemas.android.com/apk/res/android"
    android:layout_width="fill_parent"
    android:layout_height="wrap_content"
    android:orientation="horizontal" >

    <TextView
        android:id="@+id/coltv"
        android:layout_width="0dip"
        android:layout_height="wrap_content"
        android:layout_weight="0"
        android:visibility="gone" />

    <TextView
        android:id="@+id/col0tv"
        android:layout_width="0dip"
        android:layout_height="wrap_content"
        android:layout_weight="0"
        android:visibility="gone" />

    <TextView
        android:id="@+id/col1tv"
        android:layout_width="150dp"
        android:layout_height="24dp"
        android:layout_toRightOf="@+id/col0tv"
        android:gravity="left"
        android:text="TextView"
        android:textColor="#FE2E64"
        android:textSize="10dp" />

    <TextView
        android:id="@+id/col2tv"
        android:layout_width="50dp"
        android:layout_height="24dp"
        android:layout_toRightOf="@+id/col1tv"
        android:gravity="right"
        android:text="TextView"
        android:textColor="#FE2E64"
        android:textSize="10dp" />

</RelativeLayout>

3. WebviewActivity.java

...
private Button save, urlhistory, btnClosePopup;
private PopupWindow pwindo;
...

...
public void onClick(View v) {
...
case R.id.bScriptList:
initiatePopupWindow();
Log.d("Checking poing 1 current url : ", "checklang");
break;
...
}
...

...
private void initiatePopupWindow() {
try {
// We need to get the instance of the LayoutInflater
LayoutInflater inflater = (LayoutInflater) ctx
.getSystemService(Context.LAYOUT_INFLATER_SERVICE);
View layout = inflater.inflate(R.layout.screen_popup,
(ViewGroup) webview.findViewById(R.id.popup_element));
totalList = (ListView) layout.findViewById(R.id.lvScriptHistory);
pwindo = new PopupWindow(layout, 370, 500, true);
pwindo.showAtLocation(layout, Gravity.CENTER, 0, 0);

collist.clear();
collist_0.clear();
collist_1.clear();
collist_2.clear();
DatabaseOperations dop = new DatabaseOperations(ctx);
Log.d("Checking poing 1 current url : ", dop.toString());
try {
Cursor cur = dop.getTotalScript(dop);
Log.d("Checking poing 1 current cur : ", cur.toString());
while (cur.moveToNext()) {
String valueofcol = cur.getString(0);
String valueofcol0 = cur.getString(1);
String valueofcol1 = cur.getString(2);
String valueofcol2 = cur.getString(3);
Log.d("Checking poing 1 current valueofcol1 : ",
valueofcol1);
Log.d("Checking poing 1 current valueofcol2 : ",
valueofcol2);
collist.add(valueofcol);
collist_0.add(valueofcol0);
collist_1.add(valueofcol1);
collist_2.add(valueofcol2);
}
} catch (Exception e) {
e.printStackTrace();
} finally {
dop.close();
}
String[] from = new String[] { "col", "col_0", "col_1", "col_2" };
int[] to = new int[] { R.id.coltv, R.id.col0tv, R.id.col1tv,
R.id.col2tv };
// prepare the list of all records
List<HashMap<String, String>> fillMaps = new ArrayList<HashMap<String, String>>();
for (int i = 0; i < collist_1.size(); i++) {
HashMap<String, String> map = new HashMap<String, String>();
map.put("col", collist.get(i));
map.put("col_0", collist_0.get(i));
map.put("col_1", collist_1.get(i));
map.put("col_2", collist_2.get(i));
fillMaps.add(map);
}

SimpleAdapter adapter = new SimpleAdapter(ctx, fillMaps,
R.layout.popup_list, from, to) {
@Override
public View getView(int position, View convertView,
ViewGroup parent) {
final View v = super.getView(position, convertView, parent);
return v;
}

};

totalList.setAdapter(adapter);

btnClosePopup = (Button) layout.findViewById(R.id.btn_close_popup);
btnClosePopup.setOnClickListener(cancel_button_click_listener);

} catch (Exception e) {
e.printStackTrace();
}

totalList.setClickable(true);
totalList.setItemsCanFocus(false);
totalList.setOnItemClickListener(new OnItemClickListener() {

@Override
public void onItemClick(AdapterView<?> parent, View view,
int position, long id) {
// TODO Auto-generated method stub
String url = ((TextView) view.findViewById(R.id.col0tv))
.getText().toString();
String url1 = ((TextView) view.findViewById(R.id.coltv))
.getText().toString();
Log.d("wanna click ", url);
// set selected id
currentid = url1;
pwindo.dismiss();
webview.loadUrl(url);
Log.d("clicked?  ", url1);
}
});
}

private OnClickListener cancel_button_click_listener = new OnClickListener() {
public void onClick(View v) {
pwindo.dismiss();

}
};
...

4. DatabaseOperations.java


...
public Cursor getTotalScript(DatabaseOperations dop) {
sql = dop.getReadableDatabase();
return sql.rawQuery("select * from urlhistory order by id desc", null);
}
...

Simple usage of sqlite with android.//sqlite 간단한 사용법 -1 Create/Add

Introduce how to use sqlite with Android - Save current page.


1. webviewactivity.xml


add: button which will save current page to your sqlite server

 <Button
        android:id="@+id/bScript"
        android:layout_width="wrap_content"
        android:layout_height="wrap_content"
        android:layout_alignParentLeft="true"
        android:layout_alignParentBottom="true"
        android:text="save" />

2. WebviewActivity.java


add: below lines

public class WebviewActivity extends Fragment implements OnClickListener {
...
private String currentUrl, currentUrlTitle;
private Button save;
...

private void getInitialValues(View view) {

...
save = (Button) view.findViewById(R.id.bScript);
save.setOnClickListener(this);
...
}
...

...
private void setWebCondition() {
...
webview.setWebChromeClient(new WebChromeClient() {
@Override
public void onReceivedTitle(WebView view, String sTitle) {
super.onReceivedTitle(view, sTitle);
if (sTitle != null && sTitle.length() > 0) {
currentUrlTitle = sTitle;
} else {
currentUrlTitle = "Web Page";
}
}
});
...
}
...

...
private void startWebView(WebView view, String url) {
// TODO Auto-generated method stub
view.setWebViewClient(new WebViewClient() {
ProgressDialog progressDialog;

// If you will not use this method url links are open in new brower
// not in webview
public boolean shouldOverrideUrlLoading(WebView view, String url) {
if (url != "outofapp") {
view.loadUrl(url);
currentUrl = url;
return true;
}
return false;
}
...

...
@Override
public void onClick(View v) {
// TODO Auto-generated method stub
switch (v.getId()) {
case R.id.bScript:
DatabaseOperations dop = new DatabaseOperations(ctx);
dop.addUrl(dop, currentUrl, currentUrlTitle);
Toast.makeText(ctx, "URL is successfully saved", 0).show();
break;
}
}
...

3. DatabaseOperations.java


package com.example.sidebarmenuwebview;

import android.content.ContentValues;
import android.content.Context;
import android.database.Cursor;
import android.database.sqlite.SQLiteDatabase;
import android.database.sqlite.SQLiteOpenHelper;
import android.util.Log;

public class DatabaseOperations extends SQLiteOpenHelper {

private DatabaseOperations dop;
private SQLiteDatabase sql;
public static final int database_version = 1;
public String TABLE_QUERY = "CREATE TABLE urlhistory ( id INTEGER primary key AUTOINCREMENT, "
+ "url TEXT, title TEXT, created_at  TIMESTAMP DEFAULT CURRENT_TIMESTAMP );";

public DatabaseOperations(Context context) {
//DB name
super(context, "url_info", null, database_version);

}

@Override
public void onCreate(SQLiteDatabase db) {
// TODO Auto-generated method stub
// create new table
db.execSQL(TABLE_QUERY);
}

@Override
public void onUpgrade(SQLiteDatabase db, int oldVersion, int newVersion) {
// TODO Auto-generated method stub

}

public void addUrl(DatabaseOperations dop, String url, String title) {
sql = dop.getWritableDatabase();
ContentValues cv = new ContentValues();
cv.put("url", url);
cv.put("title", title);
long k = sql.insert("urlhistory", null, cv);
}
}


Tuesday 21 April 2015

Side Menu bar on Webview usage, Listview onselectitemlistner - 0/사이드 매뉴바 와 웹뷰 사용방법

To create side menu bar with side gesture on webview.


1. activity_main.xml


<android.support.v4.widget.DrawerLayout xmlns:android="http://schemas.android.com/apk/res/android"
    android:id="@+id/drawer_layout"
    android:layout_width="match_parent"
    android:layout_height="match_parent" >

    <FrameLayout
        android:id="@+id/content_frame"
        android:layout_width="match_parent"
        android:layout_height="match_parent" >
    </FrameLayout>

    <ListView
        android:id="@+id/left_drawer"
        android:layout_width="100dp"
        android:layout_height="match_parent"
        android:layout_gravity="start"
        android:choiceMode="singleChoice"
        android:divider="@android:color/transparent"
        android:dividerHeight="0dp"
        android:layerType="software" />

</android.support.v4.widget.DrawerLayout>

2. webviewactivity.xml


<?xml version="1.0" encoding="utf-8"?>
<RelativeLayout xmlns:android="http://schemas.android.com/apk/res/android"
    android:layout_width="match_parent"
    android:layout_height="match_parent">

    <WebView
        android:id="@+id/webView1"
        android:layout_width="match_parent"
        android:layout_height="match_parent" />
 
</RelativeLayout>

3. sidemenulist.xml


<?xml version="1.0" encoding="utf-8"?>
<TableLayout xmlns:android="http://schemas.android.com/apk/res/android"
    android:layout_width="match_parent"
    android:layout_height="match_parent" >

    <TableRow>
        <ImageView
            android:id="@+id/img"
            android:layout_width="match_parent"
            android:layout_height="match_parent"/>
    </TableRow>

</TableLayout>

4. MainActivity.java


public class MainActivity extends Activity {
private String[] menu;
private Integer[] icons;
private DrawerLayout dLayout;
private ListView dList;
private CustomList adapter;
private String url1 = "http://www.yahoo.com/";
private String url2 = "http://www.youtube.com/";
private String url3 = "https://9gag.com/";
private String url;
private ProgressDialog pDialog;
private WebView view;

@Override
protected void onCreate(Bundle savedInstanceState) {
super.onCreate(savedInstanceState);
setContentView(R.layout.activity_main);

menu = new String[] { "", "", "", "" }; // add text if you need in menu
icons = new Integer[] { R.drawable.yahoo, R.drawable.youtube_log,
R.drawable.ninegag, R.drawable.exit_logo };
view = (WebView) findViewById(R.id.webView1);
dLayout = (DrawerLayout) findViewById(R.id.drawer_layout);
dList = (ListView) findViewById(R.id.left_drawer);
new BullpenClass().execute();
adapter = new CustomList(this, menu, icons);
dList.setAdapter(adapter);
dList.setOnItemClickListener(new OnItemClickListener() {
@Override
public void onItemClick(AdapterView<?> arg0, View v, int position,
long id) {
dLayout.closeDrawers();
if (position == 0) {
url = url1;
} else if (position == 1) {
url = url2;
} else if (position == 2) {
url = url3;
} else if (position == 3) {
finish();
System.exit(0);
} else {
url = url1;
}
Bundle args = new Bundle();
args.putString("URL", url);
Fragment detail = new WebviewActivity();
detail.setArguments(args);
FragmentManager fragmentManager = getFragmentManager();
fragmentManager.beginTransaction()
.replace(R.id.content_frame, detail).commit();
}
});

}

class BullpenClass extends AsyncTask<String, String, String> {
/**
* Before starting background thread Show Progress Dialog
* */
@Override
protected void onPreExecute() {
super.onPreExecute();
pDialog = new ProgressDialog(MainActivity.this);
pDialog.setMessage("Your Internet is Too Slow..");
pDialog.setIndeterminate(false);
pDialog.setCancelable(true);
pDialog.show();
}

/**
* Creating user
* */
protected String doInBackground(String... args) {
// Building Parameters
Bundle bundle = new Bundle();
bundle.putString("URL", url1);
Fragment detail = new WebviewActivity();
detail.setArguments(bundle);
FragmentManager fragmentManager = getFragmentManager();
fragmentManager.beginTransaction()
.replace(R.id.content_frame, detail).commit();
return null;
}

/**
* After completing background task Dismiss the progress dialog
* **/
protected void onPostExecute(String file_url) {
// dismiss the dialog once done
pDialog.dismiss();
}
}

@Override
// One webview back button will load the previous page
public void onBackPressed() {
view = (WebView) findViewById(R.id.webView1);
if (view.canGoBack()) {
view.goBack();
} else {
super.onBackPressed();
}
}
}


5. WebviewActivity.java


public class WebviewActivity extends Fragment {
// TextView text;
private WebView webview;
private String URL;
private Context ctx;

@Override
public View onCreateView(LayoutInflater inflater, ViewGroup container,
Bundle args) {
View view = inflater.inflate(R.layout.webviewactivity, container,
false);
// add context for fragment.
ctx = container.getContext();
getInitialValues(view);
setWebCondition();
startWebView(webview, URL);
return view;
}


private void getInitialValues(View view) {
// TODO Auto-generated method stub
URL = getArguments().getString("URL");
webview = (WebView) view.findViewById(R.id.webView1);
}

private void startWebView(WebView view, String url) {
// TODO Auto-generated method stub
view.setWebViewClient(new WebViewClient() {
ProgressDialog progressDialog;

// If you will not use this method url links are open in new brower
// not in webview
public boolean shouldOverrideUrlLoading(WebView view, String url) {
if (url != "outofapp") {
view.loadUrl(url);
return true;
}
return false;
}

public void onLoadResource(WebView view, String url) {
if (progressDialog == null) {
progressDialog = new ProgressDialog(getActivity());
progressDialog.setMessage("Loading...");
progressDialog.show();
}
}

public void onPageFinished(WebView view, String url) {
super.onPageFinished(view, url);
progressDialog.dismiss();
}

});
view.loadUrl(url);
}

// Webview settings
private void setWebCondition() {
// TODO Auto-generated method stub
WebSettings settings = webview.getSettings();
settings.setLayoutAlgorithm(LayoutAlgorithm.SINGLE_COLUMN);
settings.setSupportMultipleWindows(false);
settings.setJavaScriptEnabled(true);
settings.setLoadWithOverviewMode(true);
settings.setUseWideViewPort(true);
webview.setWebViewClient(new WebViewClient());
webview.setWebChromeClient(new WebChromeClient());
settings.setJavaScriptCanOpenWindowsAutomatically(true);
settings.setBuiltInZoomControls(true);
webview.requestFocusFromTouch();
}
}

6. CustomList.java


public class CustomList extends ArrayAdapter<String> {
private final Activity context;
private final String[] web;
private final Integer[] imageId;

public CustomList(Activity context, String[] web, Integer[] imageId) {
super(context, R.layout.sidemenulist, web);
this.context = context;
this.web = web;
this.imageId = imageId;
}

@Override
public View getView(int position, View view, ViewGroup parent) {
LayoutInflater inflater = context.getLayoutInflater();
View rowView = inflater.inflate(R.layout.sidemenulist, null, true);
ImageView imageView = (ImageView) rowView.findViewById(R.id.img);
imageView.setImageResource(imageId[position]);
return rowView;
}
}

7. AndroidManifest.xml


<?xml version="1.0" encoding="utf-8"?>
<manifest xmlns:android="http://schemas.android.com/apk/res/android"
    package="com.example.sidebarmenuwebview"
    android:versionCode="1"
    android:versionName="1.0" >

    <uses-sdk
        android:minSdkVersion="11"
        android:targetSdkVersion="21" />
    <uses-permission android:name="android.permission.INTERNET"/>

    <application
        android:allowBackup="true"
        android:icon="@drawable/ic_launcher"
        android:label="@string/app_name"
        android:theme="@style/AppTheme" >
        <activity
            android:name=".MainActivity"
            android:label="@string/app_name" >
            <intent-filter>
                <action android:name="android.intent.action.MAIN" />

                <category android:name="android.intent.category.LAUNCHER" />
            </intent-filter>
        </activity>
    </application>

</manifest>

8. Action Points.


  • minSdkVersion should be over 11.
  • Internet permission is mandatory.
  • menu icons need to add under drawable folder.