Thursday 23 April 2015

Android Simple Share Button -5/간단한 쉐어 버튼 만들기...

Introduce how to add share button in your application.

Now I would like to use previous app which I post below.
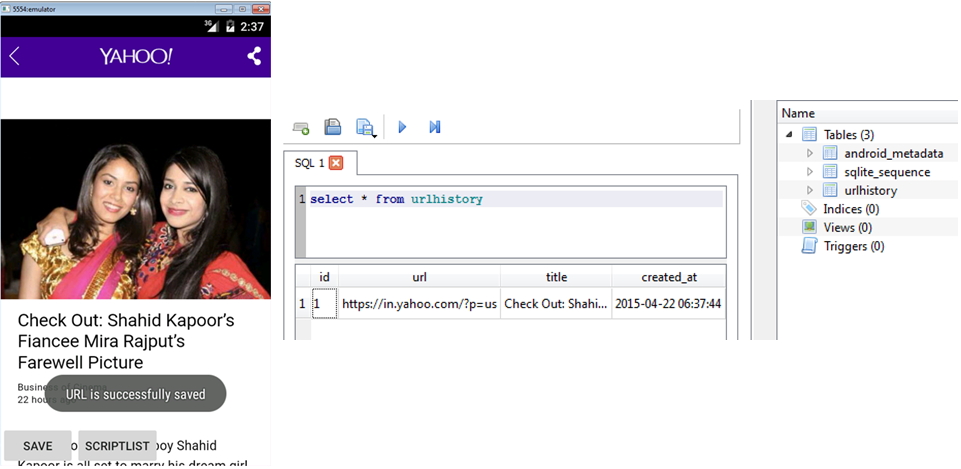
Use Save button add additional share button under current alert dialog.


1.WebviewActivity.java


...
public void onClick(View v) {
...

...
builder.setItems(new CharSequence[] { "URL Save", "Screenshot",

"Screenshot + Share", "URL Share", "exit" },
...
...
case 2:
// save screenshot
View vi = webview.getRootView();
vi.setDrawingCacheEnabled(true);
Bitmap bitmap = Bitmap.createBitmap(vi
.getDrawingCache());
vi.setDrawingCacheEnabled(true);
String savename = "KarlScreenShot"
+ System.currentTimeMillis() + ".png";
try {
FileOutputStream fos = new FileOutputStream(
new File(
Environment
.getExternalStoragePublicDirectory(
Environment.DIRECTORY_PICTURES)
.toString(), savename));
bitmap.compress(CompressFormat.PNG, 100, fos);
fos.flush();
fos.close();
} catch (FileNotFoundException e) {
e.printStackTrace();
} catch (IOException e) {
e.printStackTrace();
}
String imagePath = Environment
.getExternalStoragePublicDirectory(Environment.DIRECTORY_PICTURES)
+ "/" + savename;
Log.d("check imagePath", imagePath);
File imageFileToShare = new File(imagePath);

MediaScannerConnection.scanFile(ctx,
new String[] { imageFileToShare
.getAbsolutePath() }, null,
new OnScanCompletedListener() {
public void onScanCompleted(String path,
Uri uri) {
Log.v("grokkingandroid", "file " + path
+ " was scanned seccessfully: "
+ uri);
}
});
Intent share = new Intent(Intent.ACTION_SEND);
share.setType("image/*");
Uri uri = Uri.fromFile(imageFileToShare);
share.putExtra(Intent.EXTRA_STREAM, uri);
startActivity(Intent.createChooser(share,
"Share Image!"));
break;
case 3:
Intent textshare = new Intent(
android.content.Intent.ACTION_SEND);
textshare.setType("text/plain");
textshare
.addFlags(Intent.FLAG_ACTIVITY_CLEAR_WHEN_TASK_RESET);
textshare.putExtra(Intent.EXTRA_SUBJECT,
currentUrlTitle);
textshare.putExtra(Intent.EXTRA_TEXT, currentUrl);
Log.d("What do you Think", currentUrlTitle + currentUrl);
startActivity(Intent.createChooser(textshare,
"Share link!"));

break;
...

Wednesday 22 April 2015

Android Simple Alert Screenshot Button -4/간단한 스샷 버튼 만들기...

Introduce how to add screenshot button in your application.

Now I would like to use previous app which I post below.
Use Save button add alert with screenshot button.


1.WebviewActivity.java


...
public void onClick(View v) {

...

case R.id.bScript:
AlertDialog.Builder builder = new AlertDialog.Builder(ctx);
builder.setTitle("How do you like to save this page?");
builder.setItems(new CharSequence[] { "URL Save", "Screenshot", "exit" },
new DialogInterface.OnClickListener() {
public void onClick(DialogInterface dialog,
int which) {
switch (which) {
case 0:
// save url in sqlite
DatabaseOperations dop = new DatabaseOperations(
ctx);
dop.addUrl(dop, currentUrl, currentUrlTitle);
Toast.makeText(ctx,
"URL is successfully saved", 0)
.show();
break;
case 1:
// save screenshot
View v = webview.getRootView();
v.setDrawingCacheEnabled(true);
Bitmap bmp = Bitmap.createBitmap(v
.getDrawingCache());
v.setDrawingCacheEnabled(true);
String filename = "KarlScreenShot"
+ System.currentTimeMillis()
+ ".png";
try {
FileOutputStream fos = new FileOutputStream(
new File(
Environment
.getExternalStoragePublicDirectory(
Environment.DIRECTORY_PICTURES)
.toString(),
filename));
bmp.compress(CompressFormat.PNG, 100,
fos);
fos.flush();
fos.close();
} catch (FileNotFoundException e) {
e.printStackTrace();
} catch (IOException e) {
e.printStackTrace();
}
Toast.makeText(ctx,
"Screenshot is successfully saved",
0).show();
break;
case 2:
break;
}
}
});
builder.create().show();

break;
...

2. AndroidManifest.xml

...
<uses-permission android:name="android.permission.WRITE_EXTERNAL_STORAGE" />
...

please do not forget to add this permission.


Simple usage of sqlite with android.//sqlite 간단한 사용법 -3 delete sqlite

Introduce how to use sqlite with Android - Delete saved URL.


1. popup_list.xml


...
<Button
        android:id="@+id/bDelete"
        android:layout_width="24dp"
        android:layout_height="24dp"
        android:layout_gravity="center"
        android:layout_toRightOf="@+id/col2tv"
        android:focusable="false"
        android:focusableInTouchMode="false"
        android:background="@drawable/delete" />
...

2. WebviewActivity.java


...
private void initiatePopupWindow() {
...
Button b = (Button) v.findViewById(R.id.bDelete);
b.setOnClickListener(new OnClickListener() {

@Override
public void onClick(View arg0) {
new AlertDialog.Builder(ctx)
.setTitle("Script entry")
.setMessage(
"Are you sure you want to delete this script?")
.setPositiveButton(
android.R.string.yes,
new DialogInterface.OnClickListener() {
public void onClick(
DialogInterface dialog,
int which) {
// continue with delete
// no idea how to get this
// id.
String currentid = ((TextView) v
.findViewById(R.id.coltv))
.getText()
.toString();
Log.d("clickedid",
currentid);
DatabaseOperations dop = new DatabaseOperations(
ctx);
dop.deleteScript(dop,
currentid);
pwindo.dismiss();
Toast.makeText(
ctx,
"selected script was successfully deleted",
Toast.LENGTH_LONG)
.show();
}
})
.setNegativeButton(
android.R.string.no,
new DialogInterface.OnClickListener() {
public void onClick(
DialogInterface dialog,
int which) {
// do nothing
}
})
.setIcon(android.R.drawable.ic_dialog_alert)
.show();
// TODO Auto-generated method stub
}
});
...

3. DatabaseOperations.java


...
public void deleteScript(DatabaseOperations dop, String rowId) {
Log.d("db selected id?", rowId);
sql = dop.getWritableDatabase();
sql.execSQL("DELETE FROM  urlhistory where id='"+ rowId +"'");
}
...

Simple usage of sqlite with android.//sqlite 간단한 사용법 -2 읽어오기

Introduce how to use sqlite with Android - read data from sqlite.


1. screen_popup.xml


<LinearLayout xmlns:android="http://schemas.android.com/apk/res/android"
    android:id="@+id/popup_element"
    android:layout_width="fill_parent"
    android:layout_height="fill_parent"
    android:background="#444444"
    android:orientation="vertical"
    android:padding="10sp" >

    <ListView
        android:id="@+id/lvScriptHistory"
        android:layout_width="wrap_content"
        android:layout_height="260dp" >
    </ListView>

    <Button
        android:id="@+id/btn_close_popup"
        android:layout_width="wrap_content"
        android:layout_height="wrap_content"
        android:layout_gravity="center"
        android:text="Close" />

</LinearLayout>

2. popup_list.xml


<?xml version="1.0" encoding="utf-8"?>
<RelativeLayout xmlns:android="http://schemas.android.com/apk/res/android"
    android:layout_width="fill_parent"
    android:layout_height="wrap_content"
    android:orientation="horizontal" >

    <TextView
        android:id="@+id/coltv"
        android:layout_width="0dip"
        android:layout_height="wrap_content"
        android:layout_weight="0"
        android:visibility="gone" />

    <TextView
        android:id="@+id/col0tv"
        android:layout_width="0dip"
        android:layout_height="wrap_content"
        android:layout_weight="0"
        android:visibility="gone" />

    <TextView
        android:id="@+id/col1tv"
        android:layout_width="150dp"
        android:layout_height="24dp"
        android:layout_toRightOf="@+id/col0tv"
        android:gravity="left"
        android:text="TextView"
        android:textColor="#FE2E64"
        android:textSize="10dp" />

    <TextView
        android:id="@+id/col2tv"
        android:layout_width="50dp"
        android:layout_height="24dp"
        android:layout_toRightOf="@+id/col1tv"
        android:gravity="right"
        android:text="TextView"
        android:textColor="#FE2E64"
        android:textSize="10dp" />

</RelativeLayout>

3. WebviewActivity.java

...
private Button save, urlhistory, btnClosePopup;
private PopupWindow pwindo;
...

...
public void onClick(View v) {
...
case R.id.bScriptList:
initiatePopupWindow();
Log.d("Checking poing 1 current url : ", "checklang");
break;
...
}
...

...
private void initiatePopupWindow() {
try {
// We need to get the instance of the LayoutInflater
LayoutInflater inflater = (LayoutInflater) ctx
.getSystemService(Context.LAYOUT_INFLATER_SERVICE);
View layout = inflater.inflate(R.layout.screen_popup,
(ViewGroup) webview.findViewById(R.id.popup_element));
totalList = (ListView) layout.findViewById(R.id.lvScriptHistory);
pwindo = new PopupWindow(layout, 370, 500, true);
pwindo.showAtLocation(layout, Gravity.CENTER, 0, 0);

collist.clear();
collist_0.clear();
collist_1.clear();
collist_2.clear();
DatabaseOperations dop = new DatabaseOperations(ctx);
Log.d("Checking poing 1 current url : ", dop.toString());
try {
Cursor cur = dop.getTotalScript(dop);
Log.d("Checking poing 1 current cur : ", cur.toString());
while (cur.moveToNext()) {
String valueofcol = cur.getString(0);
String valueofcol0 = cur.getString(1);
String valueofcol1 = cur.getString(2);
String valueofcol2 = cur.getString(3);
Log.d("Checking poing 1 current valueofcol1 : ",
valueofcol1);
Log.d("Checking poing 1 current valueofcol2 : ",
valueofcol2);
collist.add(valueofcol);
collist_0.add(valueofcol0);
collist_1.add(valueofcol1);
collist_2.add(valueofcol2);
}
} catch (Exception e) {
e.printStackTrace();
} finally {
dop.close();
}
String[] from = new String[] { "col", "col_0", "col_1", "col_2" };
int[] to = new int[] { R.id.coltv, R.id.col0tv, R.id.col1tv,
R.id.col2tv };
// prepare the list of all records
List<HashMap<String, String>> fillMaps = new ArrayList<HashMap<String, String>>();
for (int i = 0; i < collist_1.size(); i++) {
HashMap<String, String> map = new HashMap<String, String>();
map.put("col", collist.get(i));
map.put("col_0", collist_0.get(i));
map.put("col_1", collist_1.get(i));
map.put("col_2", collist_2.get(i));
fillMaps.add(map);
}

SimpleAdapter adapter = new SimpleAdapter(ctx, fillMaps,
R.layout.popup_list, from, to) {
@Override
public View getView(int position, View convertView,
ViewGroup parent) {
final View v = super.getView(position, convertView, parent);
return v;
}

};

totalList.setAdapter(adapter);

btnClosePopup = (Button) layout.findViewById(R.id.btn_close_popup);
btnClosePopup.setOnClickListener(cancel_button_click_listener);

} catch (Exception e) {
e.printStackTrace();
}

totalList.setClickable(true);
totalList.setItemsCanFocus(false);
totalList.setOnItemClickListener(new OnItemClickListener() {

@Override
public void onItemClick(AdapterView<?> parent, View view,
int position, long id) {
// TODO Auto-generated method stub
String url = ((TextView) view.findViewById(R.id.col0tv))
.getText().toString();
String url1 = ((TextView) view.findViewById(R.id.coltv))
.getText().toString();
Log.d("wanna click ", url);
// set selected id
currentid = url1;
pwindo.dismiss();
webview.loadUrl(url);
Log.d("clicked?  ", url1);
}
});
}

private OnClickListener cancel_button_click_listener = new OnClickListener() {
public void onClick(View v) {
pwindo.dismiss();

}
};
...

4. DatabaseOperations.java


...
public Cursor getTotalScript(DatabaseOperations dop) {
sql = dop.getReadableDatabase();
return sql.rawQuery("select * from urlhistory order by id desc", null);
}
...

Simple usage of sqlite with android.//sqlite 간단한 사용법 -1 Create/Add

Introduce how to use sqlite with Android - Save current page.


1. webviewactivity.xml


add: button which will save current page to your sqlite server

 <Button
        android:id="@+id/bScript"
        android:layout_width="wrap_content"
        android:layout_height="wrap_content"
        android:layout_alignParentLeft="true"
        android:layout_alignParentBottom="true"
        android:text="save" />

2. WebviewActivity.java


add: below lines

public class WebviewActivity extends Fragment implements OnClickListener {
...
private String currentUrl, currentUrlTitle;
private Button save;
...

private void getInitialValues(View view) {

...
save = (Button) view.findViewById(R.id.bScript);
save.setOnClickListener(this);
...
}
...

...
private void setWebCondition() {
...
webview.setWebChromeClient(new WebChromeClient() {
@Override
public void onReceivedTitle(WebView view, String sTitle) {
super.onReceivedTitle(view, sTitle);
if (sTitle != null && sTitle.length() > 0) {
currentUrlTitle = sTitle;
} else {
currentUrlTitle = "Web Page";
}
}
});
...
}
...

...
private void startWebView(WebView view, String url) {
// TODO Auto-generated method stub
view.setWebViewClient(new WebViewClient() {
ProgressDialog progressDialog;

// If you will not use this method url links are open in new brower
// not in webview
public boolean shouldOverrideUrlLoading(WebView view, String url) {
if (url != "outofapp") {
view.loadUrl(url);
currentUrl = url;
return true;
}
return false;
}
...

...
@Override
public void onClick(View v) {
// TODO Auto-generated method stub
switch (v.getId()) {
case R.id.bScript:
DatabaseOperations dop = new DatabaseOperations(ctx);
dop.addUrl(dop, currentUrl, currentUrlTitle);
Toast.makeText(ctx, "URL is successfully saved", 0).show();
break;
}
}
...

3. DatabaseOperations.java


package com.example.sidebarmenuwebview;

import android.content.ContentValues;
import android.content.Context;
import android.database.Cursor;
import android.database.sqlite.SQLiteDatabase;
import android.database.sqlite.SQLiteOpenHelper;
import android.util.Log;

public class DatabaseOperations extends SQLiteOpenHelper {

private DatabaseOperations dop;
private SQLiteDatabase sql;
public static final int database_version = 1;
public String TABLE_QUERY = "CREATE TABLE urlhistory ( id INTEGER primary key AUTOINCREMENT, "
+ "url TEXT, title TEXT, created_at  TIMESTAMP DEFAULT CURRENT_TIMESTAMP );";

public DatabaseOperations(Context context) {
//DB name
super(context, "url_info", null, database_version);

}

@Override
public void onCreate(SQLiteDatabase db) {
// TODO Auto-generated method stub
// create new table
db.execSQL(TABLE_QUERY);
}

@Override
public void onUpgrade(SQLiteDatabase db, int oldVersion, int newVersion) {
// TODO Auto-generated method stub

}

public void addUrl(DatabaseOperations dop, String url, String title) {
sql = dop.getWritableDatabase();
ContentValues cv = new ContentValues();
cv.put("url", url);
cv.put("title", title);
long k = sql.insert("urlhistory", null, cv);
}
}


Tuesday 21 April 2015

Side Menu bar on Webview usage, Listview onselectitemlistner - 0/사이드 매뉴바 와 웹뷰 사용방법

To create side menu bar with side gesture on webview.


1. activity_main.xml


<android.support.v4.widget.DrawerLayout xmlns:android="http://schemas.android.com/apk/res/android"
    android:id="@+id/drawer_layout"
    android:layout_width="match_parent"
    android:layout_height="match_parent" >

    <FrameLayout
        android:id="@+id/content_frame"
        android:layout_width="match_parent"
        android:layout_height="match_parent" >
    </FrameLayout>

    <ListView
        android:id="@+id/left_drawer"
        android:layout_width="100dp"
        android:layout_height="match_parent"
        android:layout_gravity="start"
        android:choiceMode="singleChoice"
        android:divider="@android:color/transparent"
        android:dividerHeight="0dp"
        android:layerType="software" />

</android.support.v4.widget.DrawerLayout>

2. webviewactivity.xml


<?xml version="1.0" encoding="utf-8"?>
<RelativeLayout xmlns:android="http://schemas.android.com/apk/res/android"
    android:layout_width="match_parent"
    android:layout_height="match_parent">

    <WebView
        android:id="@+id/webView1"
        android:layout_width="match_parent"
        android:layout_height="match_parent" />
 
</RelativeLayout>

3. sidemenulist.xml


<?xml version="1.0" encoding="utf-8"?>
<TableLayout xmlns:android="http://schemas.android.com/apk/res/android"
    android:layout_width="match_parent"
    android:layout_height="match_parent" >

    <TableRow>
        <ImageView
            android:id="@+id/img"
            android:layout_width="match_parent"
            android:layout_height="match_parent"/>
    </TableRow>

</TableLayout>

4. MainActivity.java


public class MainActivity extends Activity {
private String[] menu;
private Integer[] icons;
private DrawerLayout dLayout;
private ListView dList;
private CustomList adapter;
private String url1 = "http://www.yahoo.com/";
private String url2 = "http://www.youtube.com/";
private String url3 = "https://9gag.com/";
private String url;
private ProgressDialog pDialog;
private WebView view;

@Override
protected void onCreate(Bundle savedInstanceState) {
super.onCreate(savedInstanceState);
setContentView(R.layout.activity_main);

menu = new String[] { "", "", "", "" }; // add text if you need in menu
icons = new Integer[] { R.drawable.yahoo, R.drawable.youtube_log,
R.drawable.ninegag, R.drawable.exit_logo };
view = (WebView) findViewById(R.id.webView1);
dLayout = (DrawerLayout) findViewById(R.id.drawer_layout);
dList = (ListView) findViewById(R.id.left_drawer);
new BullpenClass().execute();
adapter = new CustomList(this, menu, icons);
dList.setAdapter(adapter);
dList.setOnItemClickListener(new OnItemClickListener() {
@Override
public void onItemClick(AdapterView<?> arg0, View v, int position,
long id) {
dLayout.closeDrawers();
if (position == 0) {
url = url1;
} else if (position == 1) {
url = url2;
} else if (position == 2) {
url = url3;
} else if (position == 3) {
finish();
System.exit(0);
} else {
url = url1;
}
Bundle args = new Bundle();
args.putString("URL", url);
Fragment detail = new WebviewActivity();
detail.setArguments(args);
FragmentManager fragmentManager = getFragmentManager();
fragmentManager.beginTransaction()
.replace(R.id.content_frame, detail).commit();
}
});

}

class BullpenClass extends AsyncTask<String, String, String> {
/**
* Before starting background thread Show Progress Dialog
* */
@Override
protected void onPreExecute() {
super.onPreExecute();
pDialog = new ProgressDialog(MainActivity.this);
pDialog.setMessage("Your Internet is Too Slow..");
pDialog.setIndeterminate(false);
pDialog.setCancelable(true);
pDialog.show();
}

/**
* Creating user
* */
protected String doInBackground(String... args) {
// Building Parameters
Bundle bundle = new Bundle();
bundle.putString("URL", url1);
Fragment detail = new WebviewActivity();
detail.setArguments(bundle);
FragmentManager fragmentManager = getFragmentManager();
fragmentManager.beginTransaction()
.replace(R.id.content_frame, detail).commit();
return null;
}

/**
* After completing background task Dismiss the progress dialog
* **/
protected void onPostExecute(String file_url) {
// dismiss the dialog once done
pDialog.dismiss();
}
}

@Override
// One webview back button will load the previous page
public void onBackPressed() {
view = (WebView) findViewById(R.id.webView1);
if (view.canGoBack()) {
view.goBack();
} else {
super.onBackPressed();
}
}
}


5. WebviewActivity.java


public class WebviewActivity extends Fragment {
// TextView text;
private WebView webview;
private String URL;
private Context ctx;

@Override
public View onCreateView(LayoutInflater inflater, ViewGroup container,
Bundle args) {
View view = inflater.inflate(R.layout.webviewactivity, container,
false);
// add context for fragment.
ctx = container.getContext();
getInitialValues(view);
setWebCondition();
startWebView(webview, URL);
return view;
}


private void getInitialValues(View view) {
// TODO Auto-generated method stub
URL = getArguments().getString("URL");
webview = (WebView) view.findViewById(R.id.webView1);
}

private void startWebView(WebView view, String url) {
// TODO Auto-generated method stub
view.setWebViewClient(new WebViewClient() {
ProgressDialog progressDialog;

// If you will not use this method url links are open in new brower
// not in webview
public boolean shouldOverrideUrlLoading(WebView view, String url) {
if (url != "outofapp") {
view.loadUrl(url);
return true;
}
return false;
}

public void onLoadResource(WebView view, String url) {
if (progressDialog == null) {
progressDialog = new ProgressDialog(getActivity());
progressDialog.setMessage("Loading...");
progressDialog.show();
}
}

public void onPageFinished(WebView view, String url) {
super.onPageFinished(view, url);
progressDialog.dismiss();
}

});
view.loadUrl(url);
}

// Webview settings
private void setWebCondition() {
// TODO Auto-generated method stub
WebSettings settings = webview.getSettings();
settings.setLayoutAlgorithm(LayoutAlgorithm.SINGLE_COLUMN);
settings.setSupportMultipleWindows(false);
settings.setJavaScriptEnabled(true);
settings.setLoadWithOverviewMode(true);
settings.setUseWideViewPort(true);
webview.setWebViewClient(new WebViewClient());
webview.setWebChromeClient(new WebChromeClient());
settings.setJavaScriptCanOpenWindowsAutomatically(true);
settings.setBuiltInZoomControls(true);
webview.requestFocusFromTouch();
}
}

6. CustomList.java


public class CustomList extends ArrayAdapter<String> {
private final Activity context;
private final String[] web;
private final Integer[] imageId;

public CustomList(Activity context, String[] web, Integer[] imageId) {
super(context, R.layout.sidemenulist, web);
this.context = context;
this.web = web;
this.imageId = imageId;
}

@Override
public View getView(int position, View view, ViewGroup parent) {
LayoutInflater inflater = context.getLayoutInflater();
View rowView = inflater.inflate(R.layout.sidemenulist, null, true);
ImageView imageView = (ImageView) rowView.findViewById(R.id.img);
imageView.setImageResource(imageId[position]);
return rowView;
}
}

7. AndroidManifest.xml


<?xml version="1.0" encoding="utf-8"?>
<manifest xmlns:android="http://schemas.android.com/apk/res/android"
    package="com.example.sidebarmenuwebview"
    android:versionCode="1"
    android:versionName="1.0" >

    <uses-sdk
        android:minSdkVersion="11"
        android:targetSdkVersion="21" />
    <uses-permission android:name="android.permission.INTERNET"/>

    <application
        android:allowBackup="true"
        android:icon="@drawable/ic_launcher"
        android:label="@string/app_name"
        android:theme="@style/AppTheme" >
        <activity
            android:name=".MainActivity"
            android:label="@string/app_name" >
            <intent-filter>
                <action android:name="android.intent.action.MAIN" />

                <category android:name="android.intent.category.LAUNCHER" />
            </intent-filter>
        </activity>
    </application>

</manifest>

8. Action Points.


  • minSdkVersion should be over 11.
  • Internet permission is mandatory.
  • menu icons need to add under drawable folder.